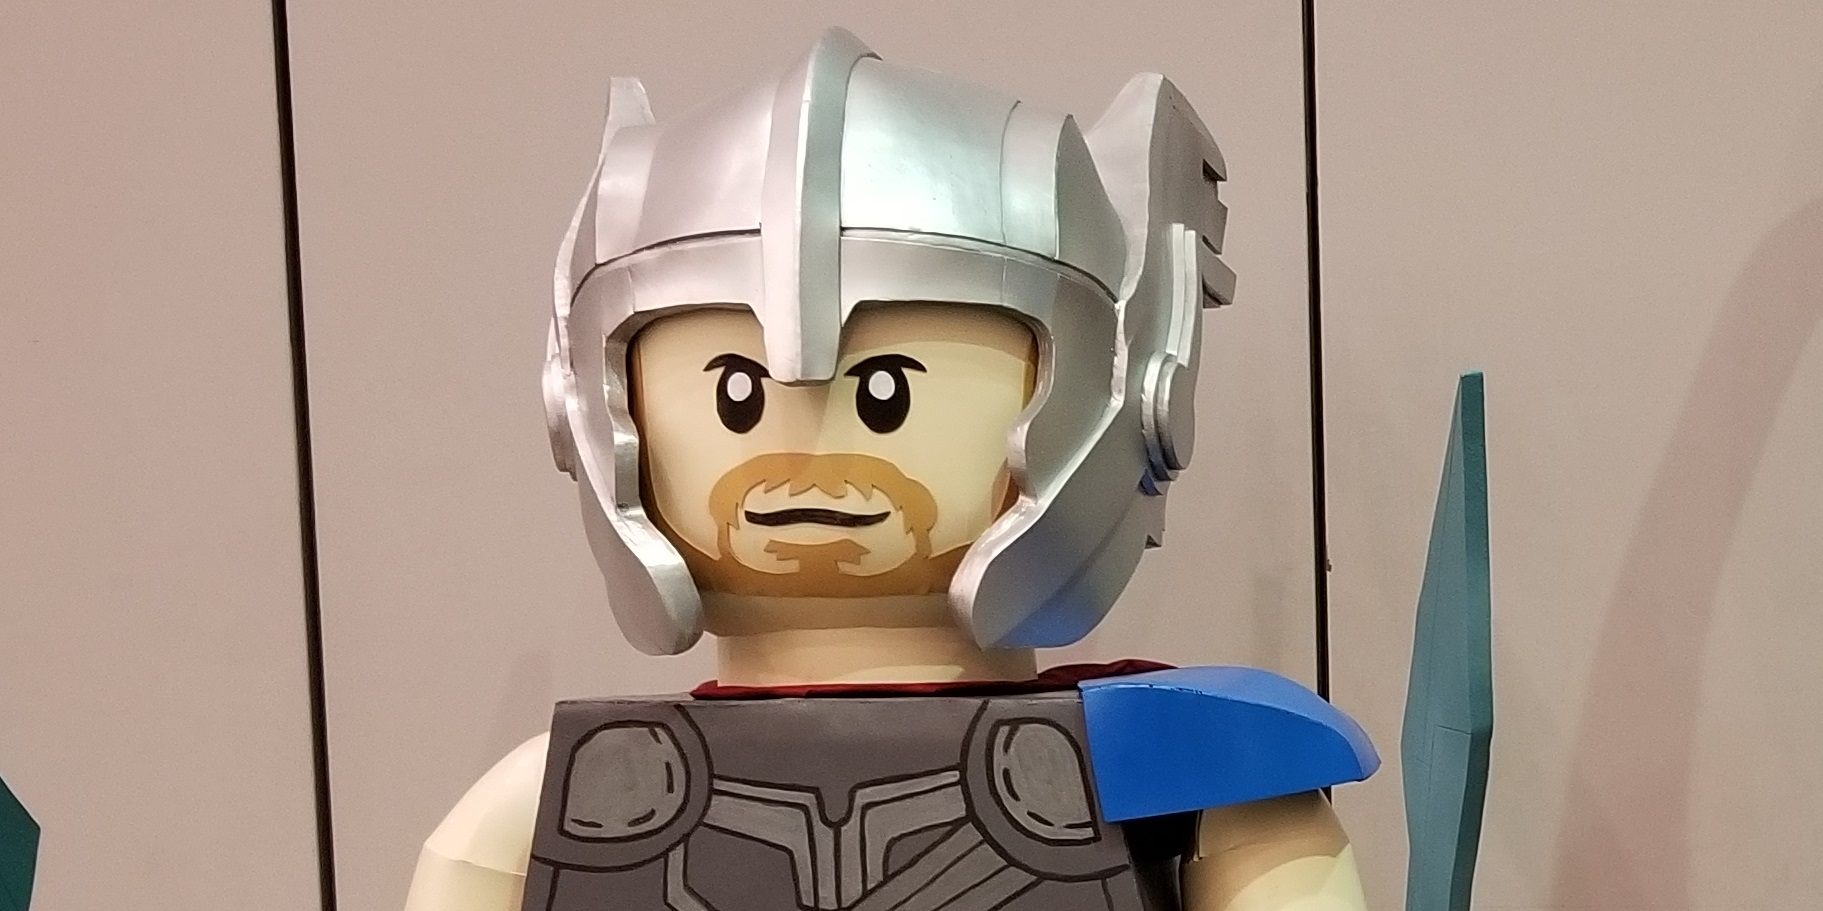
Thor
I made Thor at the same time I made Loki for the 2017 Hampton Comicon in October. It’s hard to believe that Thor and Loki were the 9th and 10th LEGO statues I’ve made.


Like with most of the statues, the head is the most unique part. I started with gluing 3 sheets of 22″x 22″ floor mat foam together to make a sheet over 56″ longs. This is cut down to an 56″ wide by 18.5″ tall sheet. Evenly spaced cuts are made and glued together to get the top and bottom curves. See some of my previous LEGO statues for more information on making a blank LEGO head. For this head, I used another long sheet to make the outer shell. Because the diameter is a little longer, I cut the sheet to 60″ wide. I leave the full 22″ height and figure out where to cut it later once it’s resting on the head. The layer is made inside out.


Using a traced outline drawing of a picture of the new Thor minifig on the internet, I cut out the opening and use it as a template. I drew and cut the opening in the helmet. I then created two angled long strips of foam to create this ridge that starts at the nose pieces and extends to the back of the helmet. On Thor’s helmet, there’s a groove a few above the eyes. I use this groove as a spacer to give the helmet a little more depth. I added a few short sections to connect the “groove” to the edge of the helmet just above the eyes. These pieces are offset to by half the width of the foam to create the groove. I put a spacer at the top of the helmet over the “peg” in the head to give the helmet a little more height. I added longer pieces of foam from the “groove” in the front, over the spacer at the top, to the back of the helmet. This step is not pictured but you can see the result in a few pictures.


Thor’s helmet has a distinct piece that starts at the jaw, goes through the center of the side of the helmet, and beyond to form a “wing” in the back. In the movie, this piece rotates down and locks into place. There’s 4 layers to this piece so I made one big template and then traced smaller templates for each layer that stacked. Unfortunately this used a lot of foam and added a lot of weight to the helmet. That weight caused problems I discuss below.


The first layer of the side piece is glued to the helmet near the jaw. I had to curl the inner layer when attaching this piece so the helmet would keep that curl along the jaw. I’ve added the bottom later of the neck guard. With these two large wings flapping around, I created this curved piece to hold it in place. In the third picture above, you can see one side with this piece on the left and the open hollow area on the right. This is not movie accurate but is close to the molded LEGO minifig piece. You can also see I’ve attached the top piece of the neck guard to the foam strips that connect to the front of the helmet. I’ve also filled in a few of the pieces to fill in the gap under the wings.


I’ve added the second layer to the side pieces. The second picture shows how the front has curved in around the jaw. At this point in the build, the wings in the back are too deep for me to turn the head on my work bench. In fact the head is hanging off the edge a little because of the shelf of spray paint cans are in the way. Fortunately I only had the small last two layers of the side pieces to attach.

After cleaning up the edges with a dremel, the helmet piece is ready to paint. This piece can be separated from the head for painting. After sealing with Mod Podge, I painted a grey base on the helmet (see above) and then a final “aluminum” spray paint coat.
About a week before the show, I discovered the head had collapsed under the weight of the helmet on the night I was ready to put the beard and eyes on. Once the foam gets weak, there’s not much you can do to fix it. I ran into this problem before on my first attempt to do Wonder Woman’s hair (like Superman’s) turned out to be too heavy for the head. Fortunately I had the time to redo the head. This time, I created another foam cylinder on the inside from the neck all the way to the top of the head. This used 2 more sheets of foam than my previous designs but it makes the head stronger.


The swords were fun to make. They only show up for a few seconds during the fight scene with the Hulk. I was lucky to find two good pictures of props from the movie on display at a convention. I used the pictures to create a semi-accurate template for the blade. I glued two piece of foam together with a dowel rod in the center for support. I carved out a groove in the foam with the dremel for the dowel rod so it didn’t add a lump in the blade but if you pinch the blade you can locate where it is. I used this method to make Frostmounre earlier in the year. With the template laid over the blade, I put pins everywhere the line pattern intersects. I then pulled the pattern off leaving the pins behind. I then used a metal ruler to connect the pins with a silver sharpie. I removed the pins and used the metal ruler to make a cut (not all the way through) with my box cutter. When you hit these cuts with a heat gun, it spreads the foam open to give an etched look to the foam. The handle is made from 2″ PVC pipe I had left over from the Voltron build. Since this had to connect to the 3/4″ PVC pipe frame in the arm, I slipped a 3/4″ tee connector into the pipe. I did have to shave a small amount off the edge to get it to slide into the hole. Part of the dowel rod I used in the blade for support was then threaded through a few foam guides I put into the handle to keep the blade in place. The blades were then painted over three nights to allow each layer to dry and then mask off for the next color.

The final statue was ready for all to see at the convention. Unfortunately the right arm did come off half way through the convention from people pulling on the arm. This has been the weak point in the design of all 11 statues (including Voltron) and I need to find another way to do it.